Installation Guide
Follow these steps to install and activate Dark Kitchen Master on your WordPress site.
Prerequisites
Before installing Dark Kitchen Master, ensure you have:
- WordPress 5.8 or higher
- WooCommerce 10.0 or higher installed and activated
- PHP 7.4 or higher
- A valid license key for Dark Kitchen Master
Important: WooCommerce 10.0 or higher is required. Versions below 10.0 may cause compatibility issues and are not supported.
Installation Methods
Method 1: WordPress Admin (Recommended)
- Log in to your WordPress admin dashboard
- Navigate to Plugins → Add New
- Click Upload Plugin at the top of the page
- Click Choose File and select the Dark Kitchen Master ZIP file
- Click Install Now
- After installation, click Activate Plugin
Method 2: FTP Upload
- Extract the Dark Kitchen Master ZIP file
- Connect to your website using an FTP client
- Navigate to
/wp-content/plugins/ - Upload the
dark-kitchen-masterfolder - Go to your WordPress admin and navigate to Plugins
- Find Dark Kitchen Master and click Activate
License Activation
After activation, the plugin uses Freemius for license management. You will be prompted to activate your license:
- When you first activate the plugin, a Freemius activation screen will appear
- Enter your license key in the provided field
- Click Activate License
- Your license will be verified and activated automatically
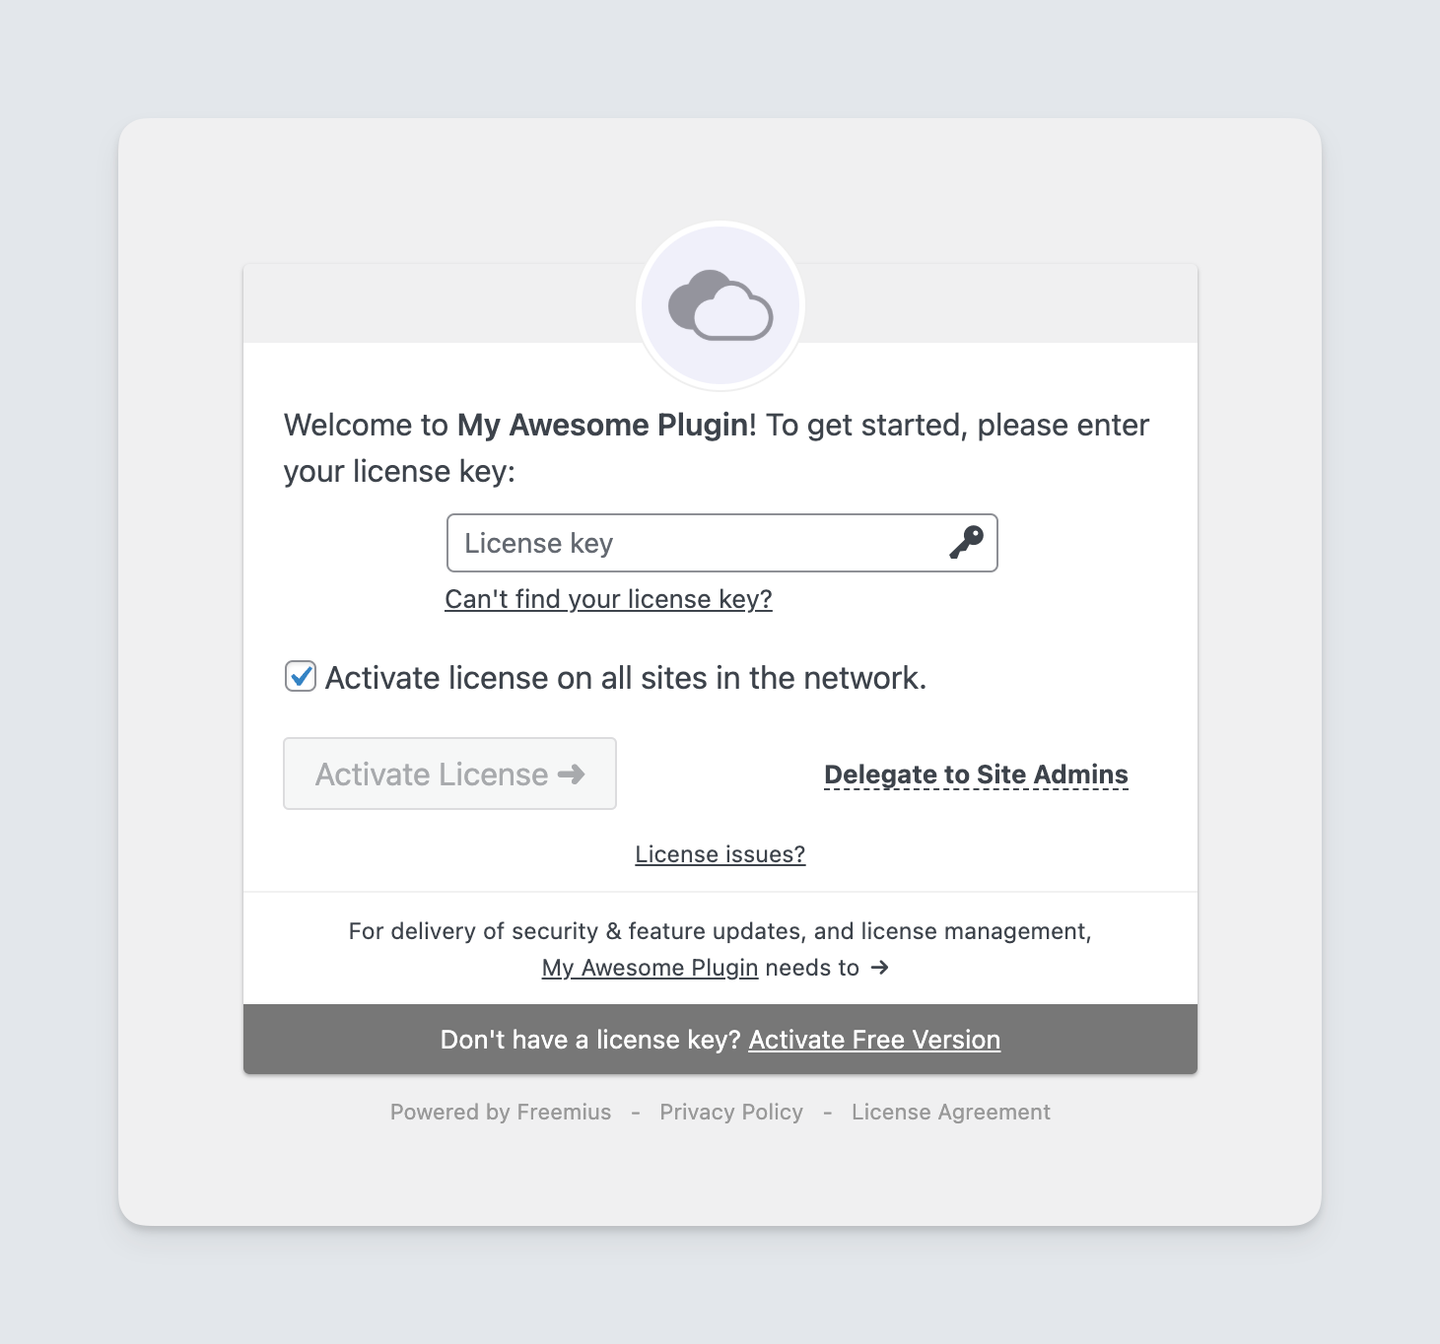
Freemius activation screen that appears when you first activate the plugin
Note: License activation is handled automatically by Freemius. You don't need to manually navigate to settings to activate your license.
Verification
To verify the installation was successful:
- Check that Dark Kitchen Master appears in your plugins list
- Verify the plugin menu appears in your WordPress admin
- Confirm your license is activated (check the plugin dashboard)
- Test accessing the plugin settings
Important: Always backup your website before installing any plugin. If you encounter any issues during installation, contact our support team immediately.
Frequently Asked Questions
Settings
Configure Dark Kitchen Master settings to customize the plugin according to your restaurant's needs.
Delivery Zone Settings
Configure delivery zones, Google Maps API, and zone restrictions:
- Navigate to Dark Kitchen Master → Settings → Delivery Zone Settings
- Configure the following options:
- Google Maps API Key: Enter your Google Maps API key in the provided field. Make sure your API key has the following APIs enabled:
- Maps JavaScript API
- Places API
- Geocoding API
- Delivery Country: Set the default country for delivery zones
- Block Orders Outside Zones: Enable or disable blocking orders from addresses outside configured delivery zones
- Custom Message for Out-of-Zone Orders: Set a custom message to display when customers try to place orders from outside delivery zones
- Customize Address Request Modal: Customize the modal that appears when requesting customer address, including custom messages
- Out-of-Zone Message: Customize the message displayed when an address is outside all delivery zones
- Google Maps API Key: Enter your Google Maps API key in the provided field. Make sure your API key has the following APIs enabled:
- Click Save Settings
Note: You can obtain a Google Maps API key from the Google Cloud Console. Make sure to set up billing and API restrictions for security.
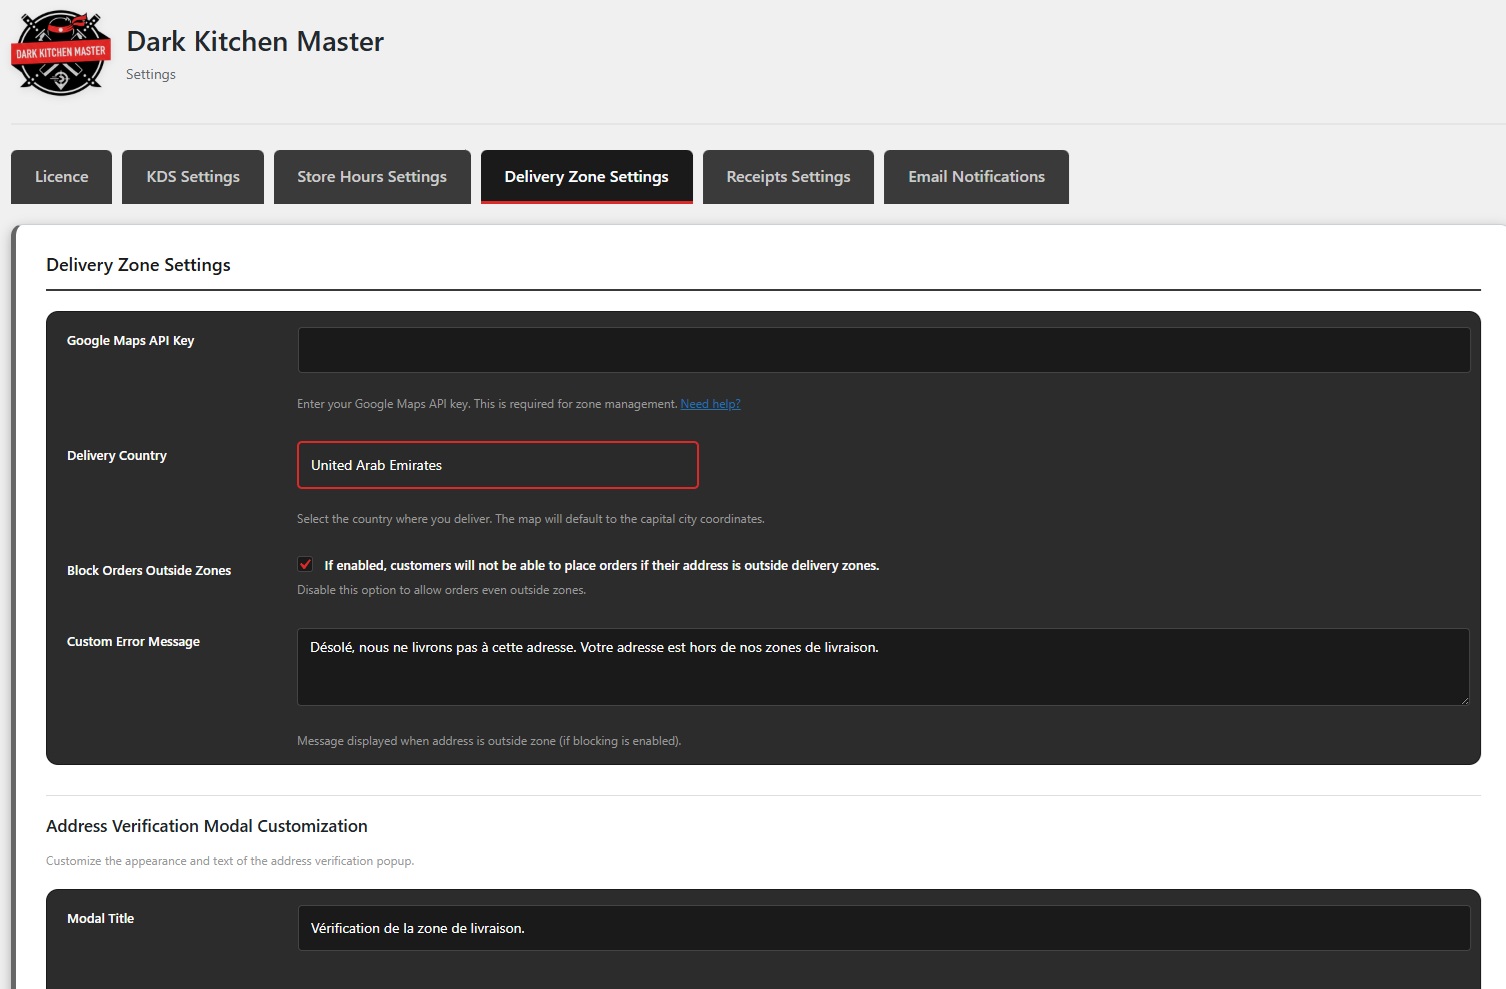
Delivery Zone Settings page showing Google Maps API key, delivery country, and zone restrictions
Store Hours
Configure store hours display, messages, countdowns, and styling:
- Navigate to Dark Kitchen Master → Settings → Store Hours
- Configure the following options:
- Display Type: Choose how to display store hours - Popup or Topbar
- Status Messages: Enable or disable messages for each status:
- Open: Customize the message displayed when store is open
- Closed: Customize the message displayed when store is closed
- Paused: Customize the message displayed when store is paused
- Emergency: Customize the message displayed during emergency mode
- Holiday: Customize the message displayed during holidays
- Countdown Options:
- Enable countdown for Opening (countdown until store opens)
- Enable countdown for Closing (countdown until store closes)
- Enable both countdowns simultaneously
- Customize the message for each countdown type
- Hide Add-to-Cart When Closed: Enable or disable hiding the "Add to Cart" button when the store is closed
- Styling Customization: Customize all visual elements:
- Popup: Colors, fonts, background, overlay, borders, padding, margins
- Topbar: Colors, fonts, background, borders, padding, margins
- Countdown: Colors, fonts, background, borders, styling
- Click Save Settings
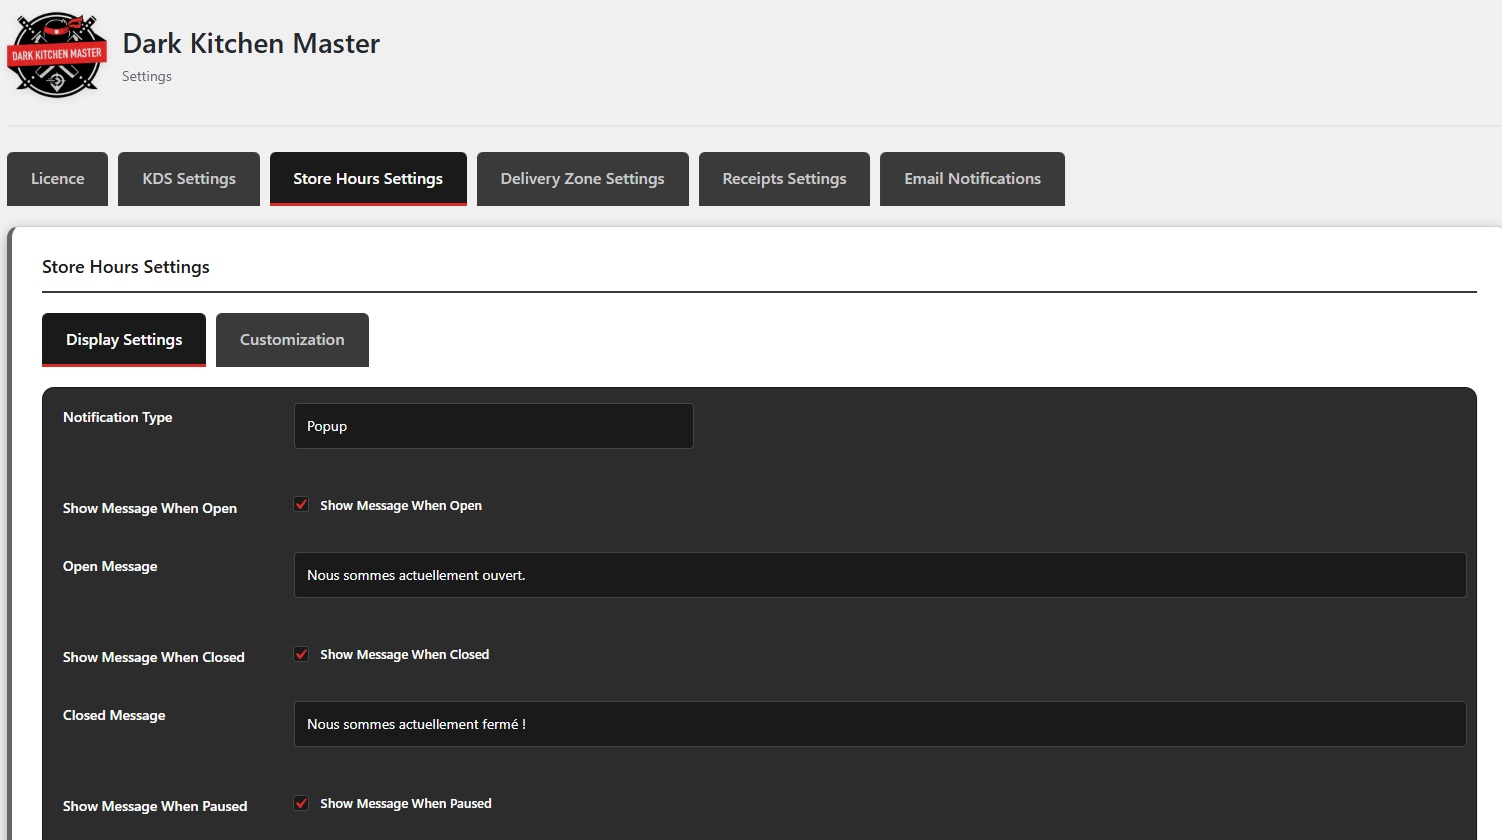
Store Hours settings page showing display type, status messages, countdown options, and styling customization
KDS Settings
Configure the Kitchen Display System settings for order management:
- Navigate to Dark Kitchen Master → Settings → KDS Settings
- Configure the following sections:
General Settings
- Enable KDS: Enable or disable the Kitchen Display System
- Refresh Interval: Set how often to check for new orders (minimum 5 seconds, default: 60 seconds)
- Show Orders from Previous Day: Enable this option for businesses that operate across two calendar days (e.g., open from 6:30 PM to 4:00 AM). This allows viewing orders from the previous day after midnight.
- Sound Notifications: Enable or disable playing sound when new orders arrive
- Notification Sound: Upload a custom notification sound (MP3 or WAV, max 5MB) or use the default notification sound
- Repeat Notification Sound: Enable to repeat the notification sound at regular intervals until the order is acknowledged
- Repeat Interval: Set how often to repeat the sound for unacknowledged orders (5-300 seconds, default: 50 seconds)
⏱️ Preparation Time & Urgent Alerts
- Enable Urgent Alerts: Enable or disable urgent alerts for orders exceeding the preparation time
- Expected Preparation Time: Set the expected preparation time in minutes (5-120 minutes, default: 20 minutes). Orders exceeding this time will trigger urgent alerts.
- Urgent Notification Sound: Upload a more urgent/alarming sound for late orders (MP3 or WAV, max 5MB). If not set, will use normal notification sound.
💡 Tip: Use a more insistent sound (beeping, alarm, etc.) to clearly differentiate from normal notifications.
Order Status Display
- Show Orders with Status: Select which order statuses should appear in the KDS:
- Pending payment
- Processing
- On hold
- Completed
- Cancelled
- Refunded
- Failed
- Preparing
- Ready for Delivery
- Draft
KDS User Access
Creating KDS Users:
- Go to Users → Add New in WordPress admin
- Create a new user and assign the role "KDS User"
- KDS users will only see the Kitchen Display and cannot access other WordPress admin areas
Kitchen Stations
Configure different stations for your kitchen (e.g., Grill, Fryer, Salad Bar). Each station can display only orders containing products from specific categories.
- Station Name: Enter a name for the station (e.g., "Pizzeria", "Bar", "Pastas")
- Color: Assign a color to visually distinguish this station
- Product Categories: Select categories for this station. Orders with products from these categories will appear on this station.
- Click Add Station to create additional stations
- Click Save Settings
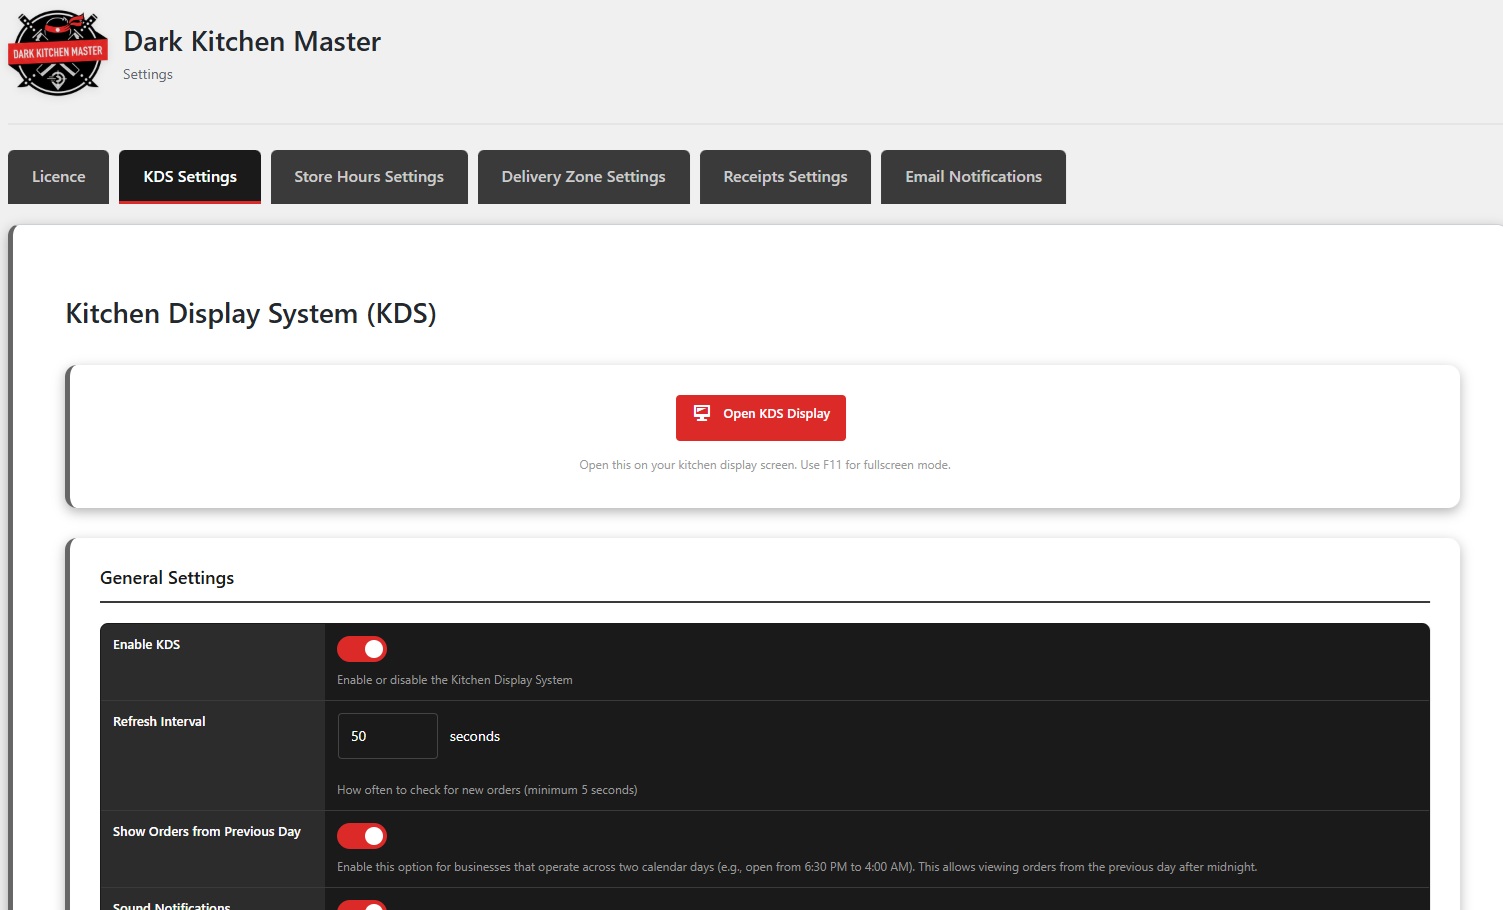
KDS Settings page showing General Settings, Preparation Time & Urgent Alerts, Order Status Display, KDS User Access, and Kitchen Stations
Note: The KDS interface supports Dark and Light themes only. You can switch between these themes directly from the KDS interface itself, not from the settings page.
Receipts
Configure receipt templates settings for kitchen tickets and delivery tickets:
- Navigate to Dark Kitchen Master → Settings → Receipts
- Configure the following sections:
Kitchen Ticket Settings
- Ticket Width: Select the width of the printed kitchen ticket (e.g., 100mm - Extra wide)
- Default Font Size: Select the default font size for the printed kitchen ticket (e.g., 12px - Medium)
Delivery Ticket Settings
- Ticket Width: Select the width of the printed delivery ticket (e.g., 80mm - Wide thermal)
- Default Font Size: Select the default font size for the printed delivery ticket (e.g., 12px - Medium)
- Click Save Settings
Note: Receipt templates are fully configurable and editable. Custom Gutenberg blocks have been created specifically for receipts, allowing you to customize the layout and content as needed. Receipts are printed for internal use by kitchen staff and delivery drivers, not sent to customers.

Receipt Templates Settings page showing Kitchen Ticket Settings and Delivery Ticket Settings
Configure email notifications sent to customers when order status changes to "Preparing" or "Ready for Delivery":
- Navigate to Dark Kitchen Master → Settings → Email
- Configure the following options:
Email Logo
- Upload Logo: Upload your restaurant logo to display in email headers. Recommended size: 200x100px.
Email Activation
- Preparing Email: Enable or disable email notification. Send email to customer when order status changes to "Preparing"
- Ready for Delivery Email: Enable or disable email notification. Send email to customer when order status changes to "Ready for Delivery"
Preparing Email Content
- Email Subject: Customize the email subject line. Available placeholders:
{order_number},{order_date} - Email Heading: The main heading displayed in the email
- Email Content: Main email content. You can use HTML. Available placeholders:
{order_number},{order_date},{customer_name},{order_details},{order_meta},{customer_details}
Ready for Delivery Email Content
- Email Subject: Customize the email subject line. Available placeholders:
{order_number},{order_date} - Email Heading: The main heading displayed in the email
- Email Content: Main email content. You can use HTML. Available placeholders:
{order_number},{order_date},{customer_name},{order_details},{order_meta},{customer_details}
- Click Save Settings
Note: Email notifications are optional and can be enabled or disabled individually for each custom status. The plugin creates two new order statuses: "Preparing" and "Ready for Delivery". You can use placeholders in email content to dynamically insert order and customer information.
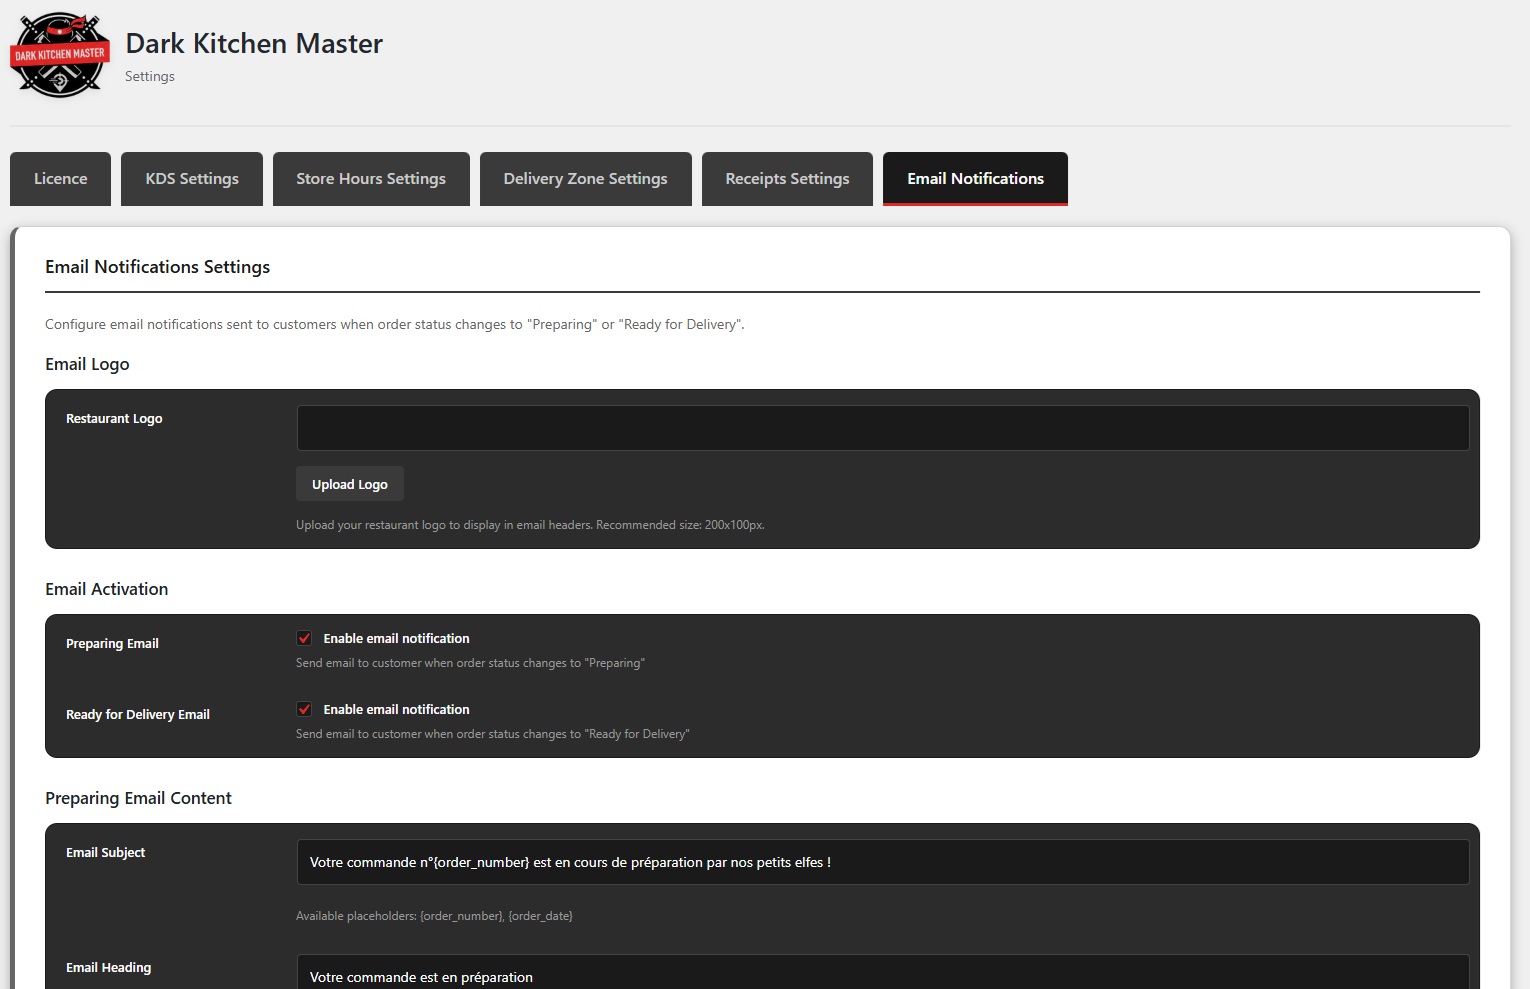
Email Notifications Settings page showing Email Logo, Email Activation, and email content configuration for Preparing and Ready for Delivery statuses
Usage
Learn how to use the various features of Dark Kitchen Master in your daily operations.
Store Hours
Manage your store opening hours and availability:
- Navigate to Dark Kitchen Master → Store Hours
- You'll see the following sections:
Current Store Status
View the current status of your store (e.g., OPEN, CLOSED, PAUSED).
Pause Store
Quickly pause your store operations when needed.
Manual Control
Override the automatic schedule to manually open or close the store. This will override the weekly schedule until you reset it to automatic.
- Current Manual Status: Shows whether you're following the automatic schedule or have manually overridden it
- Open Store Manually: Manually open the store, overriding the schedule
- Close Store Manually: Manually close the store, overriding the schedule
- Reset to Automatic: Return to following the automatic weekly schedule
Weekly Schedule
Configure your weekly opening hours for each day of the week:
- Select a day (Sunday, Monday, Tuesday, Wednesday, Thursday, Friday, Saturday)
- Add time slots for each day (e.g., 00:00 - 04:00, 16:30 - 23:59)
- You can add multiple time slots per day by clicking + Add Time Slot
- Remove time slots by clicking the × button
Holidays
Configure holiday periods when your store will be closed:
- Holiday Periods:
- Holiday Name: Enter a name for the holiday period
- From Date: Select the start date of the holiday period
- To Date: Select the end date of the holiday period
- Click Add Holiday to save the holiday period
- Existing Holidays: View and manage all configured holidays. You can see the holiday name, date range, status, and perform actions (edit, delete) on each holiday.
Store hours automatically control order availability. Orders cannot be placed outside of configured operating hours unless you manually override the schedule or have special permissions configured.
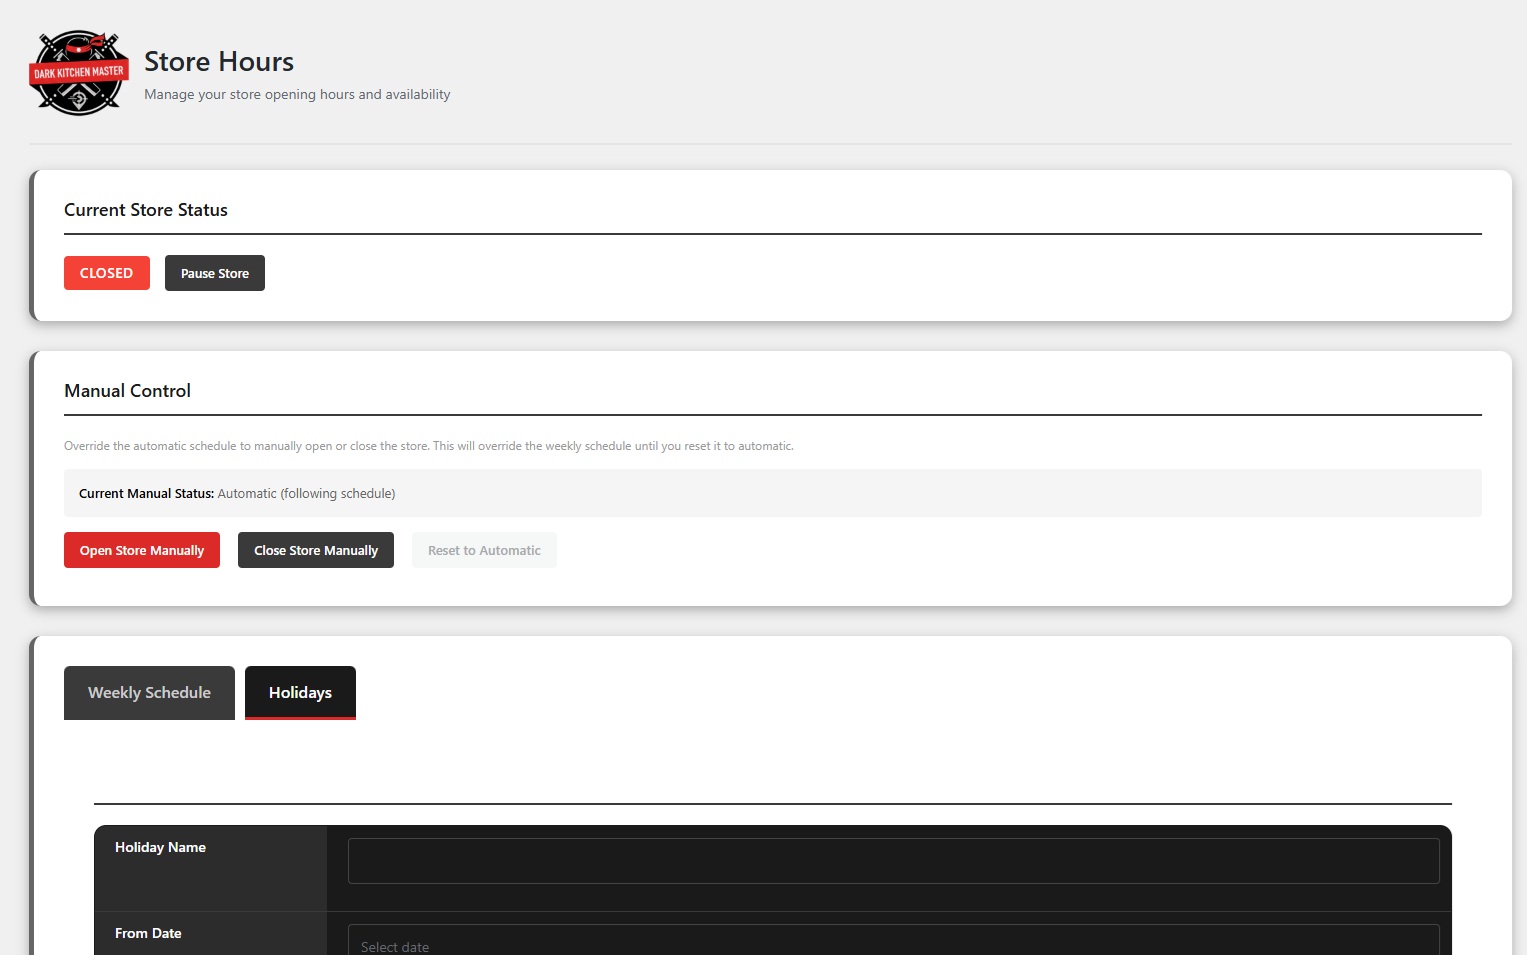
Store Hours management page showing Current Store Status, Manual Control, Weekly Schedule, and Holidays configuration
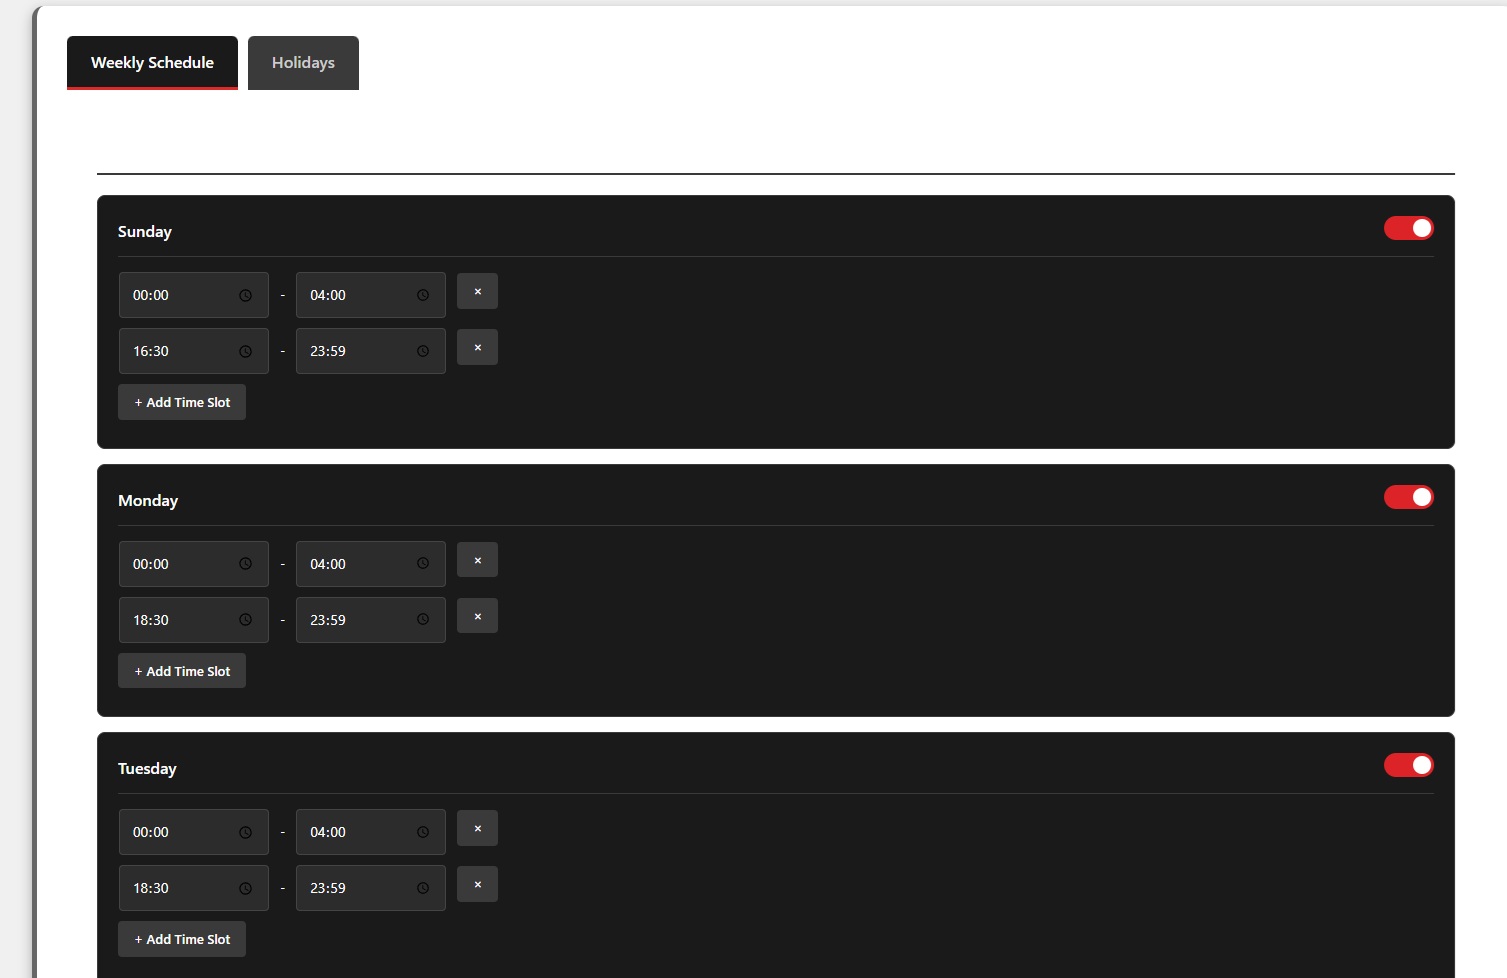
Weekly Schedule configuration interface showing time slots for each day of the week
Delivery Zones
Using delivery zones to manage your delivery service:
- Creating Zones: Draw polygons on the map to define your delivery areas
- Zone Management: Edit, delete, or deactivate zones as needed
- Fee Configuration: Set different delivery fees for different zones
- Time Estimates: Configure estimated delivery times per zone
- Minimum Orders: Set minimum order amounts for specific zones
Customers will see available delivery zones during checkout, and the system will automatically calculate fees and delivery times based on their address.
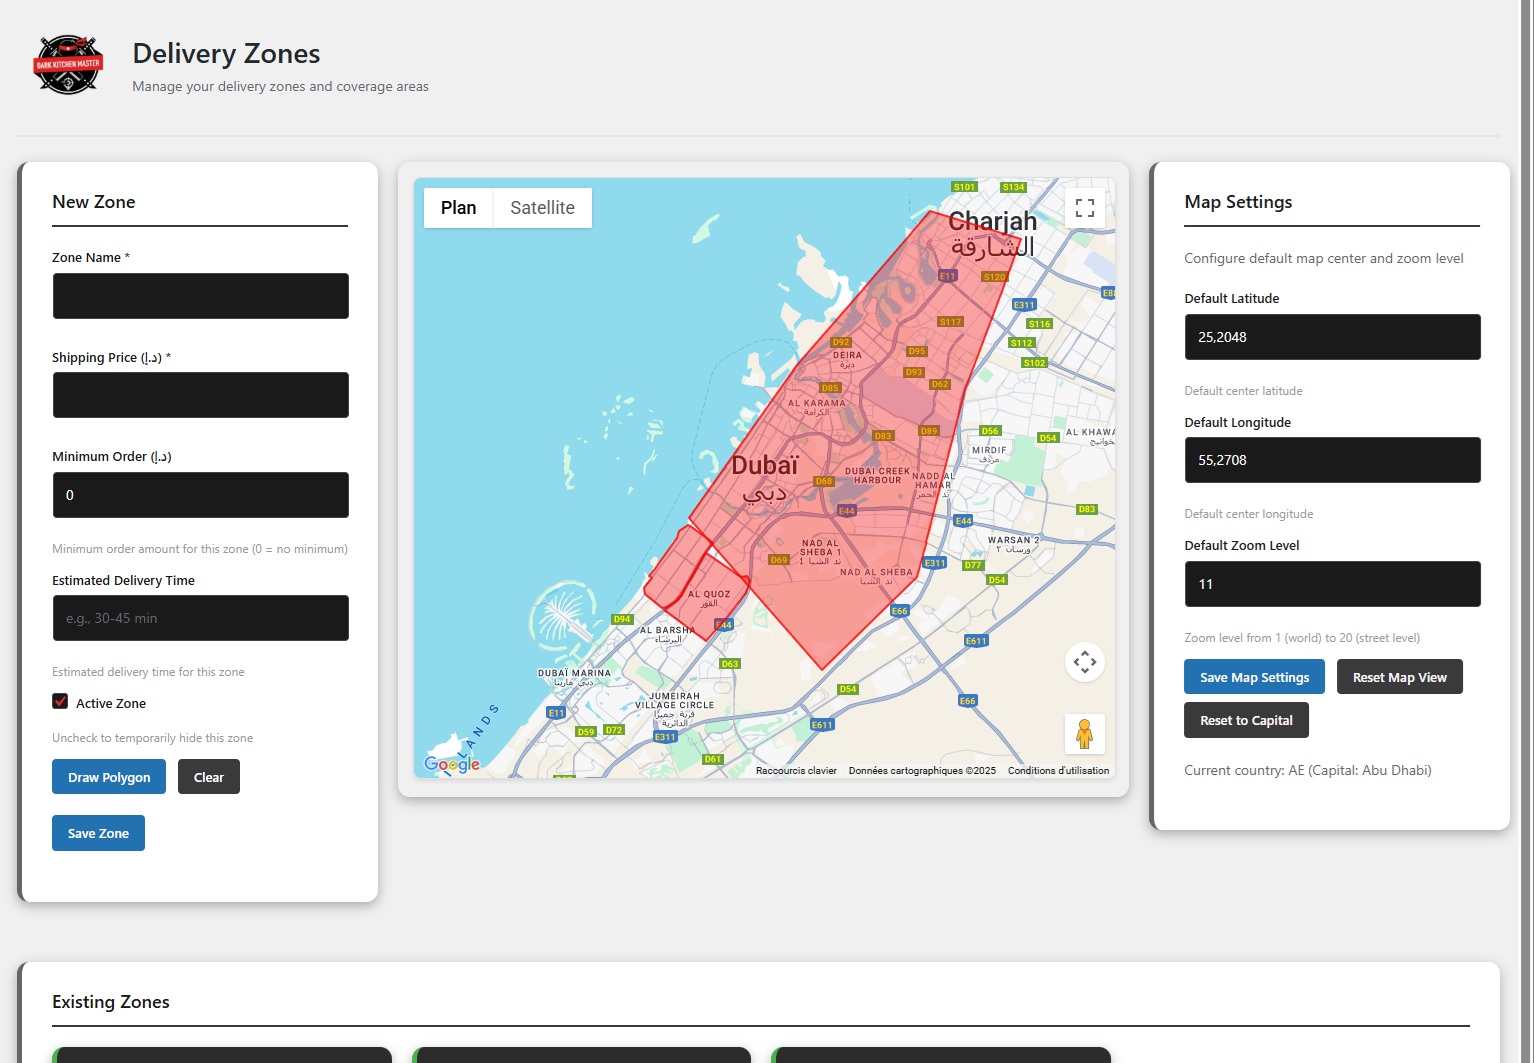
Delivery Zones management page showing zone creation, editing, and configuration options
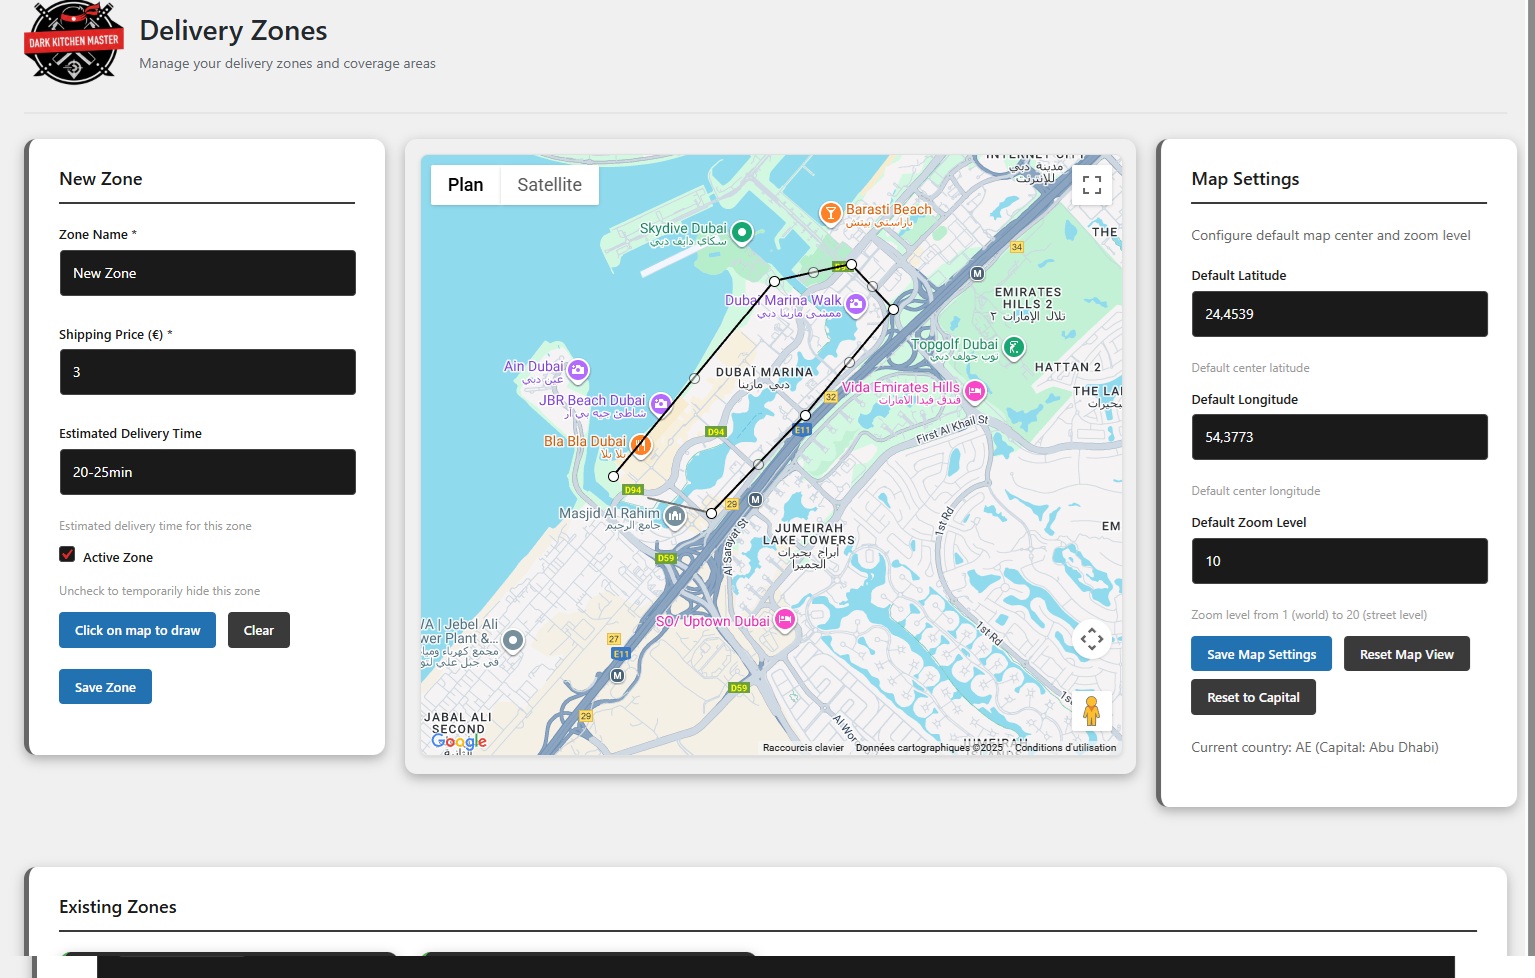
Interactive map editor for drawing polygons and defining delivery zone boundaries
Receipts
Generating and managing kitchen receipts (tickets):
- Print Receipts: Print kitchen receipts/tickets directly from the order management interface
- Configurable Templates: Receipt templates are fully configurable and editable
- Gutenberg Blocks: Use custom Gutenberg blocks to customize receipt layout and content
- Receipt Information: Include order details, customer information, and payment details
- Kitchen Tickets: Receipts serve as kitchen tickets for cooks and delivery tickets for drivers
Receipts are kitchen and delivery tickets that can be generated for any order and fully customized according to your business needs. The receipt templates are editable and can be customized using Gutenberg blocks if needed. They are printed for internal use by kitchen staff and delivery drivers, not sent to customers.

Receipt generation and printing interface showing kitchen tickets and delivery tickets
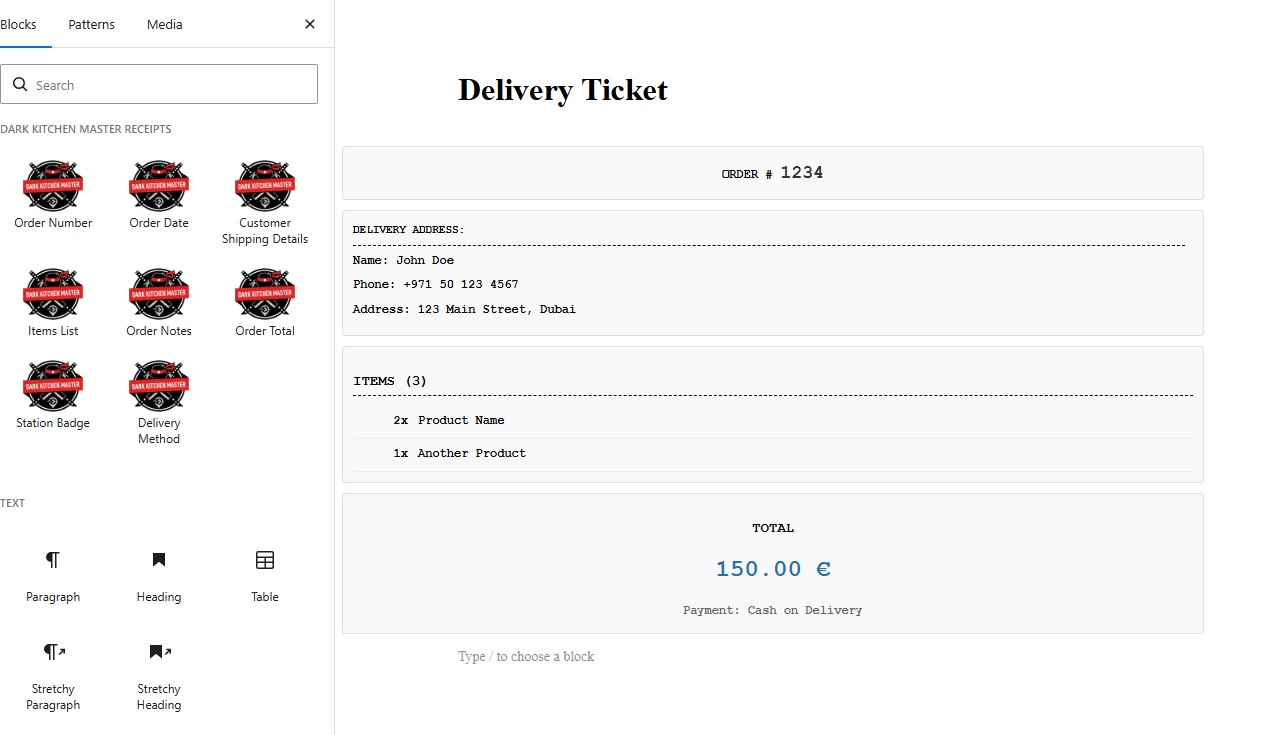
Receipt template editor with custom Gutenberg blocks for customizing receipt layout and content
KDS (Kitchen Display System)
Using the Kitchen Display System for order management:
- Accessing KDS: Navigate to the KDS page or use the shortcode to display it on any page
- Viewing Orders: See all active orders in real-time
- Order Status: Update order status including the custom statuses: "Preparing" and "Ready for Delivery"
- Theme Selection: Switch between Dark and Light themes
- Auto-Refresh: Orders automatically refresh at configured intervals
- Filtering: Filter orders by status, time, or other criteria
The KDS provides a streamlined interface for kitchen staff to manage orders efficiently. Access is controlled by user roles and permissions configured in the settings.
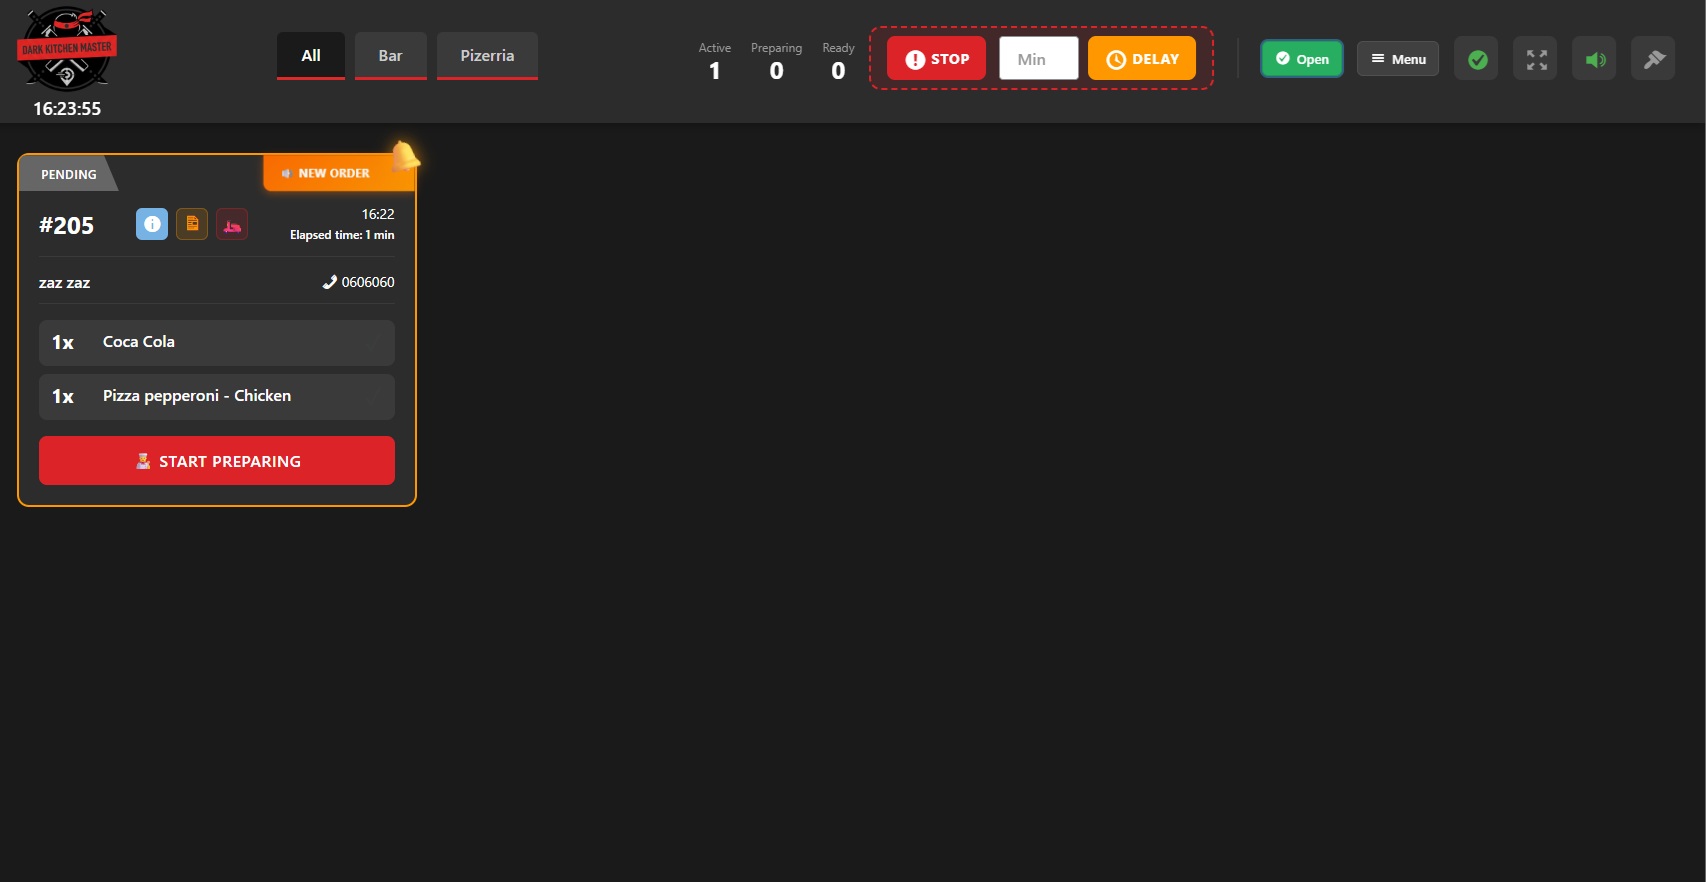
Kitchen Display System interface in Dark theme showing active orders
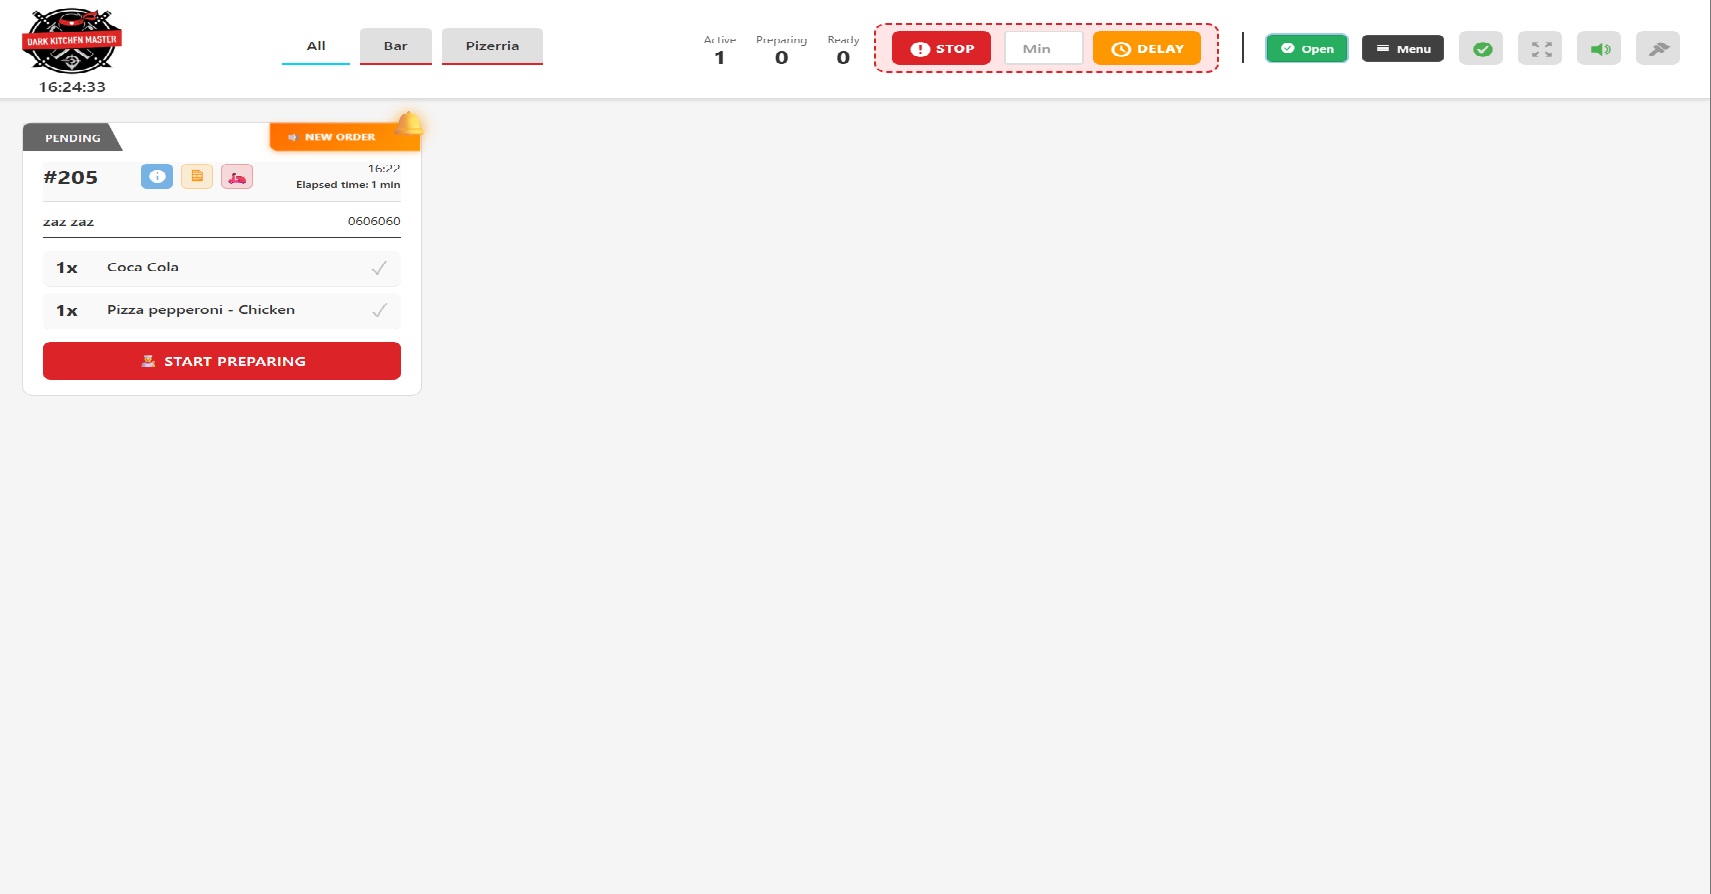
Kitchen Display System interface in Light theme
Elementor

Dark Kitchen Master includes native Elementor widgets that provide the same functionality as shortcodes but with advanced styling options. Perfect for non-developers who want to build beautiful pages visually.
Requirements: Elementor plugin must be installed and activated to use these widgets.
Available Widgets
1. DKM Delivery Time
Display estimated delivery time
- Styling options: colors, typography, padding, margin
- Same attributes as shortcode:
show_when_closed,show_when_no_zone
2. DKM Product Unavailable
Display product unavailability message
- Styling options: colors, typography, padding, margin
3. DKM Store Hours
Display store hours
Styling options separated by element:
- Status Style: Background, text color, typography, border (color, width, style, show/hide)
- Table Style: Colors, typography, header styling, text alignment, borders
- List Style: Colors, typography, text alignment, padding, borders
Same attributes as shortcode: show_status, format
4. DKM Delivery Zones
Display interactive delivery zones map
Styling options separated by element:
- Title Style: Color, typography, margin
- Zone Name Style: Color, typography
- Zone Details Style: Color, typography (for delivery time, shipping, minimum order)
- Zones List Style: Item padding, border color and width
- Map Style: Border radius
Same attributes as shortcode: height, show_info, zoom, map_type, zone_colors, center_lat, center_lng
How to Use Elementor Widgets
- Edit your page with Elementor
- In the widget panel, search for "Dark Kitchen Master" or look in the "Dark Kitchen Master" category
- Drag and drop the widget you need
- Configure settings in the Content tab
- Customize styles in the Style tab (with multiple style sections for detailed control)
- Save and preview
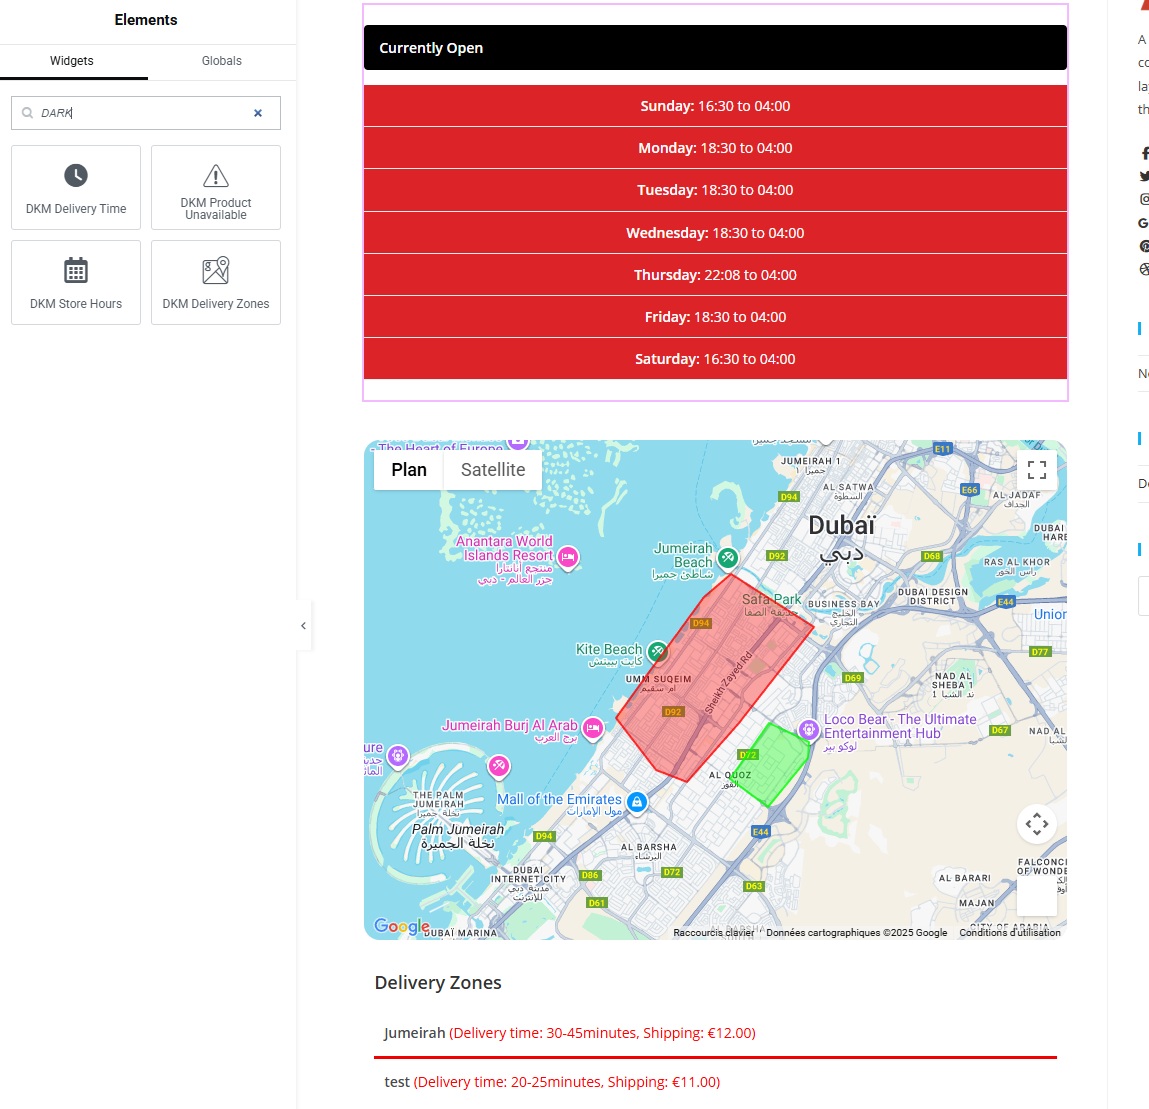
Dark Kitchen Master widgets visible in Elementor widget panel under "Dark Kitchen Master" category
Finding Elementor Widgets
To find Dark Kitchen Master widgets in Elementor:
- Open Elementor editor on any page
- Click the widget icon (or press
Ctrl+E/Cmd+E) - Search for "Dark Kitchen Master" or look in the "Dark Kitchen Master" category
- You'll see all 4 available widgets
Advantages of Elementor Widgets
- ✅ Visual interface (no need to remember shortcode syntax)
- ✅ Advanced styling options (colors, typography, borders, spacing)
- ✅ Real-time preview in Elementor editor
- ✅ Responsive controls
- ✅ All shortcode attributes available as visual controls
- ✅ Multiple style sections for detailed control (especially for Store Hours and Delivery Zones widgets)
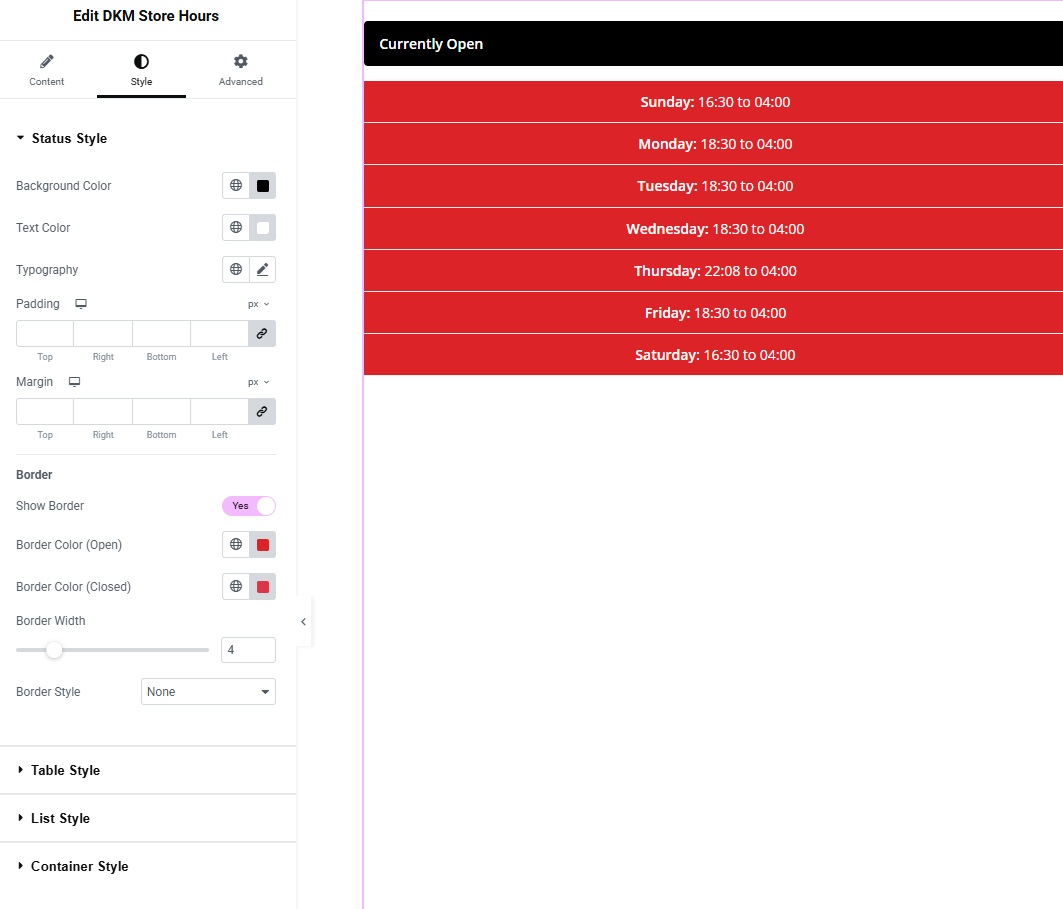
Elementor widget settings panel showing Content, Style (with multiple style sections), and Advanced tabs
Widget vs Shortcode
Use Elementor Widgets if:
- You're building pages with Elementor
- You want visual control over placement
- You want advanced styling options with multiple style sections
- You prefer drag-and-drop interface
- You want real-time preview
- You're not a developer and want an easy visual interface
Use Shortcodes if:
- You're not using Elementor
- You're editing theme templates directly
- You need to add functionality via PHP
- You're using another page builder
Note: Native Elementor widgets offer more styling options than shortcodes. Use widgets for better visual control, especially for Store Hours and Delivery Zones which have multiple style sections.
Troubleshooting Elementor Widgets
Widgets not appearing in Elementor?
- Verify Dark Kitchen Master plugin is active
- Check that Elementor plugin is installed and activated
- Clear Elementor cache (Elementor > Tools > Regenerate CSS & Data)
- Clear browser cache
- Try refreshing the Elementor editor
Widget displays but shows no content?
- Check the same troubleshooting steps as for shortcodes
- Verify widget is placed in the correct context (e.g., product page for product unavailable widget)
- Check Elementor console for JavaScript errors
Pro Tip: You can combine Elementor widgets with Elementor's other design elements (sections, columns, backgrounds, etc.) to create beautiful, fully customized pages with Dark Kitchen Master functionality.
Developers
Information for developers working with Dark Kitchen Master.
Theme Compatibility
Dark Kitchen Master is designed to work seamlessly with most modern WordPress themes. The plugin follows WordPress coding standards and uses standard hooks and filters.
Fully Compatible Themes
The following popular themes have been tested and are fully compatible:
Fully compatible
Fully compatible
Fully compatible
Fully compatible
Fully compatible
Fully compatible
General Compatibility
Dark Kitchen Master should work with any WordPress theme that:
- Follows WordPress coding standards
- Uses standard WordPress hooks and filters
- Is compatible with WooCommerce 10.0+
- Does not override WooCommerce templates in a way that breaks plugin functionality
Custom Theme Integration
If you're using a custom theme and experiencing compatibility issues, you can:
- Check that your theme properly enqueues scripts and styles
- Ensure WooCommerce is properly integrated
- Verify that your theme doesn't conflict with plugin JavaScript
- Contact our support team for assistance
Tip: If you encounter styling conflicts, you can override plugin styles in your theme's CSS file using more specific selectors.
Available Shortcodes
Dark Kitchen Master works automatically with most WordPress themes. However, if you're using a heavily customized theme or page builder, you can use these shortcodes to manually place plugin elements.
Total: 4 shortcodes available
💡 Tip for Elementor Users: Native Elementor widgets are available in the "Dark Kitchen Master" category with advanced styling options. See Elementor section.
Quick Start: You DON'T need shortcodes if you're using a standard WooCommerce theme (Storefront, Astra, OceanWP, etc.) - the plugin automatically displays everything! You only need shortcodes if you're using a page builder or have heavily customized templates.
For detailed information about each shortcode, including usage examples, attributes, and troubleshooting, please refer to the comprehensive shortcode documentation in the Elementor section above, or use the shortcode reference table below.
Shortcode Reference
| Shortcode | Parameters | Description |
|---|---|---|
[dkm_delivery_time] |
show_when_closed, show_when_no_zone | Displays estimated delivery time and zone information |
[dkm_product_unavailable] |
None | Displays unavailability notice for disabled products |
[dkm_store_hours] |
show_status, format | Displays configured store hours in table or list format |
[dkm_delivery_zones] |
height, show_info, zoom, map_type, zone_colors, center_lat, center_lng | Displays interactive map with all delivery zones |
Note: For complete documentation on shortcodes including detailed examples, PHP usage, page builder usage, custom styling, and troubleshooting, see the Elementor section above for widgets, or refer to the plugin's inline documentation.